

 Facebook
 X
X
 Pinterest
 Copy Link
How Long do Appliances and Household Fixtures Last?

Every home is made up of dozens of moving parts, and none of them last forever. From appliances and flooring to roofing and siding, every component has a general life expectancy. Knowing how long these items typically last can help homeowners plan for repairs, budget for future updates, and make informed decisions when buying or selling a home.
We’re all familiar with the cliché: They just don’t build things like they used to. And while this may be true when it comes to brick siding or slate roofing, lifespans of other household components have increased in recent years. The following guide outlines the average life expectancy of common household components, based on data from the National Association of Home Builders (NAHB) along with industry estimates.
Appliances:
Among all household components, appliances tend to have the shortest lifespan because they experience daily wear and tear. Advances in technology have improved efficiency, but modern appliances also include more electronic parts, which can lead to repairs or replacement sooner than older models. Proper maintenance can help extend the life of most appliances, but these averages provide a general guideline for planning ahead.
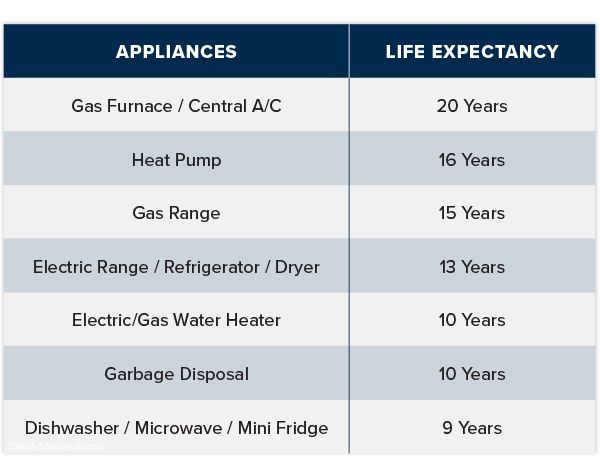
Signs It May Be Time to Replace an Appliance
Even if an appliance hasn’t reached the end of its expected lifespan, certain warning signs may mean replacement is the better option. Frequent repairs, rising energy bills, inconsistent performance, or unusual noises can all indicate that a system is wearing out.
Kitchen & Bath:
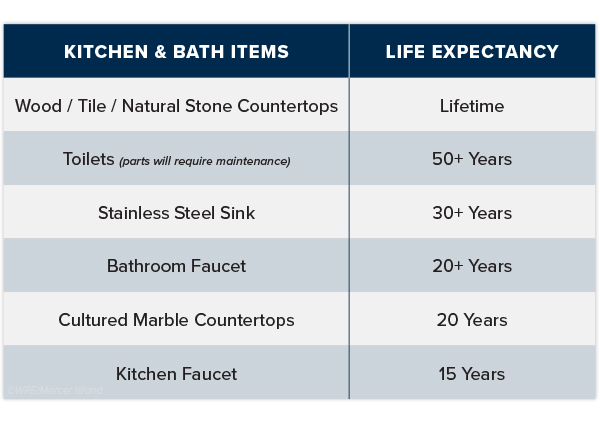
Kitchens and bathrooms see constant use, so fixtures and finishes in these spaces often wear out faster than other parts of the home. When choosing your countertops, sinks, and faucets, it helps to consider both style and durability. Some natural materials can last a lifetime, while others may need updating after a couple of decades depending on use and maintenance.
Flooring:
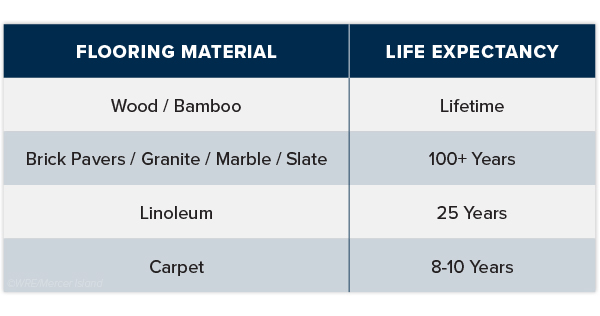
Flooring plays a major role in both the look and function of a home, but different materials have very different lifespans. High-traffic areas will naturally wear faster, while proper care and refinishing can extend the life of many surfaces. If you’re looking for longevity, wood floors are the way to go. Certain rooms in your home will be better suited for carpeting, but you can expect they’ll need replacing within a decade.
Siding & Roofing:
When choosing roofing and siding for your home, climate and maintenance level factor into the life expectancy of the material. However, brick siding and slate roofing are known to be dependable for decades.

Windows:
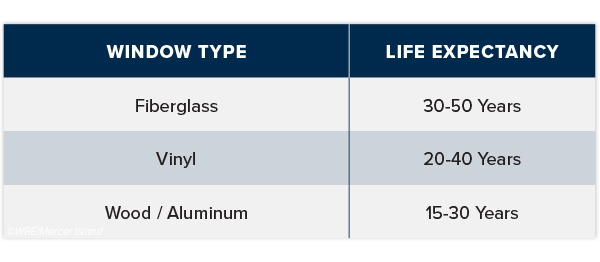
How long your windows last will vary based on moisture/wind/sun exposure and maintenance, but below is what you can expect based on material type. Wood windows also require periodic sealing/painting upkeep during their lifespan.
Are extended warranties warranted?
Extended warranties, also known as service contracts or service agreements, are sold for all types of household items from appliances to electronics. They cover service calls and repairs for a specified time beyond the manufacturer’s standard warranty.
You will have to consider whether the cost is worth it to you. For some, it brings a much-needed peace of mind when making such a large purchase. Also consider if the cost outweighs the value of the item. In some cases, it may be less expensive to replace a broken appliance than to pay for insurance or a warranty.
Staying informed about the lifespan of your home’s appliances and systems can make homeownership more manageable and help you plan ahead with confidence. If you’re thinking about buying, selling, or making updates to your home, I can help you understand which improvements matter most in today’s market.

Adapted from an article that originally appeared on the Windermere Blog

We earn the trust and loyalty of our brokers and clients by doing real estate exceptionally well. The leader in our market, we deliver client-focused service in an authentic, collaborative, and transparent manner and with the unmatched knowledge and expertise that comes from decades of experience.
© Copyright 2026, Windermere Real Estate/Mercer Island.
Helpful Hacks to Make Spring Cleaning a Breeze

Spring is almost here, and with it comes that yearly urge to polish away the winter grime. Before you plunge into a multi-day cleaning spree, however, (or burn yourself out and put it off until next year) try these helpful tips. They just might win you a few hours back in your quest for clean…
1. Work Top to Bottom
Working from ceiling to walls to counters to floors guides dust and debris downwards and prevents any re-cleaning of the same areas. Here’s a room by room checklist so you don’t miss anything:

2. Use the Dishwasher for More than Dishes
Disassemble dusty glass ceiling fixtures and light covers, then throw them in the dishwasher for a zero-effort sparkle. Ditto for children’s toys, glass candle holders, and microwave vent screens.
3. Dust Fan Blades with a Pillowcase
Make quick work of a gross fan blade by enclosing it in an old pillowcase which you hold shut as you pull it back off the blade. Step outside to shake out the dust bunnies, then repeat with the remaining blades.

Photo by Curtis Adams
4. Throw Draperies in the Dryer
For curtains that aren’t machine washable, you can still do a quick and easy refresh by putting them in the dryer for 15 minutes on no/low heat. Some dryers even have a steam setting to help gently reduce wrinkles and odors. Worried about dust mites? Either raise the dryer heat to high for fabrics that can take it, or bag up delicate curtains and freeze them for 24 hours.
5. Wash Windows When They’re Cool
Direct sunlight heats window glass, causing unsightly streaks to form before you have the chance to wipe them away. Wash them in the morning or on a cloudy day so that you only have to clean them once!

Photo by Liliana Drew
6. Let the Microwave Clean Itself
Add a few tablespoons of vinegar or some thin citrus slices to 2 cups of water. Microwave on high until it starts to boil, let sit for 5 minutes, then easily wipe clean with a paper towel or cloth.
7. Use Baking Soda on the Oven Door
Save a little elbow grease by mixing baking soda and water to form a thick paste, then spreading and letting it sit on the open oven door for 20 minutes. Gently wipe with a microfiber cloth, rinse and buff dry for a sparkling finish.
8. Shine Stainless Steel with Olive Oil
For an easy, chemical-free fix, put a little olive oil on a cloth and use it to polish away smudges and stains from your stainless-steel appliances/grill. You can find more ideas in this article on natural cleaning solutions.

Photo by RDNE Stock project
9. Naturally Clean the Dishwasher
Clean any gunk out of the drain filter, then fill a dishwasher safe container with one to two cups of vinegar and place it in the top rack. Run a cycle without dishwasher detergent nor other dishes. Once the cycle is complete, sprinkle roughly a cup of baking soda along the bottom rack and run another cycle.
10. Put Garbage Disposal Gunk on Ice
Put a handful of ice cubes down the garbage disposal along with either 1 cup coarse salt or cut up lemon pieces with the peels on. Turn on the cold water and run the disposal until everything is ground up and cleared out. Continue running and flushing with cold water for another minute. Bonus: the ice will also scrape and sharpen the blades.
11. Machine Wash Shower Curtains
Did you know your shower curtain liner can be cleaned in the washing machine? The trick is to throw in a small bath towel with it to help scour away soap scum + that weird pink stuff. Add 1/2 cup vinegar during the rinse cycle (you can use the fabric softener dispenser) to reduce mold and mildew.

Photo by RDNE Stock project
12. Bag Scum on Your Shower Head
Combine equal parts vinegar and water in a plastic bag. Tie it around your shower head so that it’s completely submerged, then soak for at least an hour. Blast the hot water to clear out any residue.
13. Use a Lint Roller on Fabric Surfaces
Great for dusting lampshades, fabric window shades, and speaker covers. It can also remove stubborn pet hair from upholstery.
14. Get the Funk Out
Deodorize carpets by sprinkling them with baking soda, working it in with a broom or soft brush, letting it sit for 30 minutes, and then vacuuming. You can use the same technique (minus the brushing) on funky mattresses.
15. Become a Robot Overlord
Once a novelty, robot vacuums have improved by leaps and bounds and are now a legitimate way to clean & mop your floors with minimal effort. Spring Cleaning may be the perfect time to invest in one and free up your time for more involved tasks.

Photo by Kindel Media
Need Some Motivation?
- Offer to host an event in the near future so that you have a deadline to work toward.
- Try organizer Shira Gill’s “15-minute win” by challenging yourself to tackle a single spring cleaning task each day…this can help you feel accomplished rather than overwhelmed, and those small tasks will add up to an extra-clean house before you know it.
- Don’t forget the power of music! You’d be surprised how much your favorite upbeat tunes can lift your mood and keep you going.
Cleaning to Sell?
Here’s a printable checklist specifically for cleaning and preparing your home for market:

We earn the trust and loyalty of our brokers and clients by doing real estate exceptionally well. The leader in our market, we deliver client-focused service in an authentic, collaborative, and transparent manner and with the unmatched knowledge and expertise that comes from decades of experience.
© Copyright 2026, Windermere Real Estate/Mercer Island.


